A job
is a container for operations that can be executed by the SQL Server
Agent. Jobs can be run once or scheduled to run on a regular basis. Jobs
provide the basis for SQL Server automation and allow for the execution
of many different types of operations, including T-SQL, SQL Server
Integration Services (SSIS) packages, and operating system commands.
Defining Job Properties
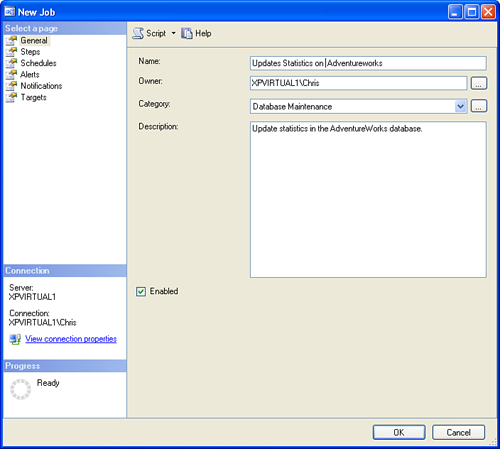
The Jobs node is located under SQL Server Agent in the Object Explorer. You right-click the Jobs node and select New Job to create a new SQL Server Agent job. A New Job dialog like the one shown in Figure 1 appears.
Note
Only logins that are part of one of the msdb fixed database roles or are members of the sysadmin fixed server role are able to create or modify jobs.
The General properties page shown in Figure 16.8 contains the basic information about the job, including the name and description. The owner of the job defaults to the login for the person creating the job; however, if the login of the person creating the job is part of the sysadmin
fixed server role, the default can be changed. You use the Category
selection to group or organize jobs. There are several predefined
categories for selection, including Database Maintenance and Log
Shipping. The default category is set to [Uncategorized(local)].
Defining Job Steps
After you add the general
information for a new job, you are ready to add the job steps that
actually perform the work. To do this, you select the Steps page on the
left side of the New Job dialog, and the job steps for this job are
listed. To create a new job step, you click the New button, and a New
Job Step dialog like the one shown in Figure 2 appears.
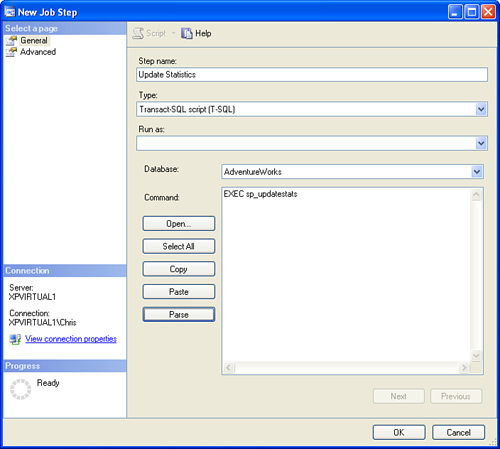
A step name is the first
piece of information you need to provide for the job step. It can be up
to 128 characters long and must be unique within the job. Then you need
to select a job step type. The SQL Server Agent can run a variety of
types of job steps, including the following:
- ActiveX script (Visual Basic, Java, Perl script)
- Operating System (CmdExec)
- PowerShell
- Replication Distributor
- Replication Merge
- Replication Queue Reader
- Replication Snapshot
- Replication Transaction Log Reader
- SQL Server Analysis Services Command
- SQL Server Analysis Services Query
- SQL Server Integration Services Package
- Transact-SQL script (T-SQL)
SQL Server Analysis Services Command, Server Analysis Services Query, and SQL Server Integration Services Package are types that were added in SQL Server 2005. They provide integration with SQL Server Analysis Services (SSAS) and SSIS.
The Step properties page displays different information, depending on the type of step selected. When the Transact-SQL script (T-SQL) type is selected, you see a window similar to the one shown in Figure 16.9. If you choose the SQL Server Integration Services Package type, the Step properties page changes to allow you to enter all the relevant information needed to execute an SSIS package.
In many cases (including
T-SQL), a command window is available to input the step commands. With a
T-SQL command, you can enter the same type of commands you would enter
in a query window. You click the Parse button to validate the SQL and
ensure proper syntax. The Operating system (CmdExec)
type allows you to enter the same types of commands that you can enter
in a command prompt window. Each step type has its own command syntax
that you can test in the native environment to ensure proper operation.
You can select the
Advanced page to configure job flow information and other information
related to the job step. On Success Action allows you to specify the
action to perform when the current job step completes. Actions include
the execution of the next job step (if one exists) and the ability to
set job status based on the step completion. The same selection options
also exist for On Failure Action.
The Retry options define
the options that relate to retrying the job step in the event that the
job step fails. Retry Attempts defines the number of times the job step
will be re-executed if it fails. Retry Intervals (Minutes) defines the
amount of time (in minutes) between retry attempts.
Tip
The
Retry options are useful for polling scenarios. For example, you might
have a job step that tests for the existence of a file during a given
period of the day. The job can be scheduled to start at a time of day
when the file is expected. If the file is not there and the step fails,
Retry Attempts can be set to poll again for the file. Retry Interval
determines how often it retries, and the combination of Retry Attempts
and Retry Interval determines the total polling window. For example, if
you want to check for the file for 2 hours, you can set Retry Attempts
to 24 with a Retry Interval of 5 minutes. If the job step fails more
than the number of retries, the step completes in failure.
The last set of options on
the Advanced page relate to the output from the job step. Job step
output can be saved to an output file that can be overwritten each time
the job step is run, or the output can be appended each time. The Log to
Table option writes the job step output to the sysjobstepslogs table in the msdb
database. The table contains one row for each job step with the Log to
Table option enabled. If Append Output to Existing Entry in Table is
enabled, the sysjobstepslogs data row
for the step can contain output for more than one execution. If this
option is not selected, the table contains only execution history for
the last execution of the step.
Caution
If you choose the Append Output to Existing Entry in Table option, the size of the sysjobstepslogs table will grow over time. You should consider using the sp_delete_jobsteplog stored procedure to remove data from the sysjobstepslogs
table. This stored procedure has several different parameters that
allow you to filter the data that will be removed. You can use these
parameters to remove log data by job, job step, date, or size of the log
for the job step.
Defining Multiple Jobs Steps
You can define multiple
jobs steps in a single job. This allows you to execute multiple
dependent job actions. The job steps run one at a time (serially), and
you can specify the order of the job steps. The job order and the
related dependencies are called control of flow.
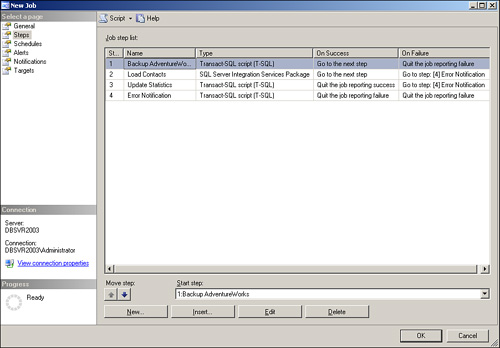
Figure 3
shows an example of a job that has multiple dependent job steps. Take
note of the On Success and On Failure columns, which define the control
of flow. For example, if step 1 succeeds, the next step occurs. If step 1
fails, no further steps are executed, and the job quits, reporting a
job failure. The control of flow is slightly different for the second
step, whereby the control of flow passes to the next step on success but
flows to the fourth step if a failure occurs.
The control of flow is
defined on each job step. The
Advanced tab of the New Job Step dialog provides drop-down lists that
allow you to specify the actions to take on success and on failure. In
addition, the Steps page that lists all of a job’s steps allows you to
specify the start step for the job. The drop-down box at the
bottom of the Steps page provides this function. You can also use the
Move Step arrows to change the start step. Manipulating the start step
is useful when you’re restarting a job manually, as in the case of a job
failure; in this situation, you might want to set the job to start on a
step other than the first step.
Note
SSIS provides the same
type of flow control capabilities as the SQL Server Agent. In fact,
maintenance plans that contain multiple related actions (such as
optimization, backup, and reporting) utilize SSIS packages. A scheduled
job starts an SSIS package, which executes the package in a single step,
but the actual maintenance steps are defined within the package. The
SSIS Designer utilizes a graphical tool that depicts the flow of control
and allows you to modify the individual steps.
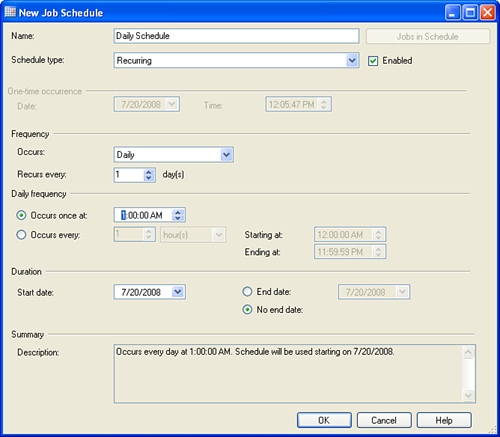
Defining Job Schedules
The SQL Server Agent
contains a comprehensive scheduling mechanism you can use to automate
the execution of your jobs. A job can have zero, one, or more schedules
assigned to it. You can view the schedules associated with a job by
selecting the Schedules page of the Job Properties screen. To create a
new schedule for a job, you can click the New button at the bottom of
the Schedules page. Figure 4
shows the New Job Schedule Properties page, with a sample schedule and
options defined. The options on this screen vary, depending on the
frequency of the job schedule. For example, if the frequency of the
schedule shown in Figure 4
were changed from daily to weekly, the screen would change to allow for
the selection of specific days during the week to run the job.
You have the ability to
share job schedules so that one job schedule can be utilized by more
than one job. When you select the Schedule page, a Pick button is
available at the bottom of the page. If you click the Pick button, a
screen appears showing all the defined schedules. If you highlight one
of the schedules in the list and click OK, the schedule is linked to the
related job. You can also view all the jobs associated with a
particular schedule by editing the schedule and clicking the Jobs in
Schedule button in the top-right portion of the Job Schedule Properties
screen.
Tracking multiple job
schedules and schedule execution can be challenging in an environment
that has many jobs and schedules. The sp_help_jobs_in_schedule, and sp_help_jobactivity stored procedures are helpful system stored procedures that are found in the msdb database. The sp_help_jobs_in_schedule stored procedure provides information about the relationship between jobs and schedules. The sp_help_jobactivity stored procedure provides point-in-time information about the runtime state of SQL Server
jobs. This stored procedure returns a lot of information, including
recent job executions, the status of those executions, and the next
scheduled run date.
Defining Job Notifications
The Notifications page of the Job Properties dialog, as shown in Figure 5, allows you to define the notification actions to perform when a job completes.
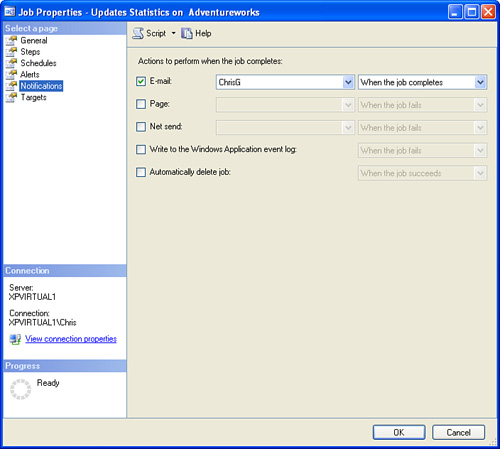
Notifications can be sent via email, pager, or NET SEND command. The notifications for a Schedule Job can be sent based on the following events:
When the job succeeds
When the job fails
When the job completes
Each of these events can
have a different notification action defined for it. For example, a
notification might send an email if the job succeeds but page someone if
it fails.
You also have the option of
writing notification information into the Windows Application event log
or automatically deleting the job when it completes. These two options
are also available on the Notifications page. Writing events to the
Application log is a useful tracking mechanism. Monitoring software is
often triggered by events in the application log. The automatic job
deletion options are useful for jobs that will be run only once. As with
the other notification options, you can set up the delete job action
such that it is deleted only when a specific job event occurs. For
example, you might want to delete the job only if the job succeeds.
Viewing Job History
You view job history via the
Log File Viewer, which is a comprehensive application that allows for
many different types of logs to be viewed. You right-click a job in the
SQL Server Agent and select History to display the Log File Viewer. Figure 6 shows the Log File Viewer with several examples of job history selected for viewing.
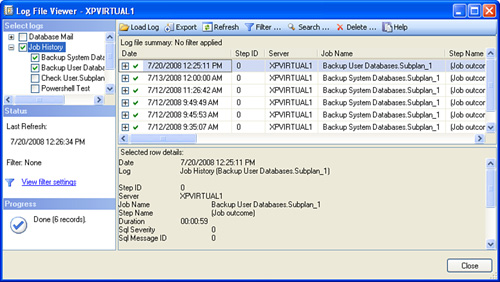
Compared to viewing job
history in SQL Server versions prior to SQL Server 2005, the current
form of the Log File Viewer has some distinct advantages for viewing job
history. In the Log File Viewer, you can select multiple jobs for
viewing at one time. To view job step details, you expand the job
entries and select a job step. You can use the row details shown below
the log file summary to troubleshoot job errors and isolate problems.
The Log File Viewer also has filtering capabilities that allow you to
isolate the jobs to view. Click on the Filter
button and the Filter Settings dialog appears. You can filter jobs by
using a number of different settings, including User, Start Date, and
Message Text. You must click the Apply Filter button for the selected
filtering option to take effect.
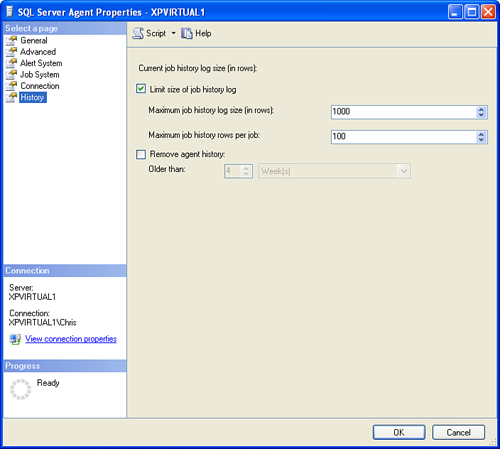
The amount of history that
is kept is based on the history settings defined for the SQL Server
Agent. You access the history settings by right-clicking the SQL Server Agent
node, selecting Properties, and then selecting the History page on the
left part of the screen. The settings available on the History page are
shown in Figure 7. By default, the job history
log is limited to 1,000 rows, with a maximum of 100 rows per job. You
can also select the Automatically Remove Agent History option and select
a period of time to retain history. This setting causes the SQL Server
Agent to periodically remove job history from the log. This is a good
approach for keeping the size of the log manageable.